
I recommend these from about 1T to 3T, and maybe a little larger for board shorts. At some point, the child will be too tall for these pockets to be practical. But I have been told that they make perfect light saber pockets for five and six-year-olds. They work well on boys and girls. Here's a pic of my favorite pair I made for a girl. Her mom told me the other day that her sweet little sister is wearing these now.

I tried to write the tutorial to accommodate all levels of sewing experience. Just click on "read more" to see it. Let me know if anything is confusing.
So, here's what you need to make these:
-- a simple pants pattern that fits your little one (if you don't have a pattern, you can use a pair of pants that fits that you aren't too attached to and cut them up along the seams to use as a pattern, I've been known to buy clothes at the children's resale shop to use as patterns, or you can use this tutorial if you don't want to cut them) -- it's better if it's a two piece pattern that has a seam down the outside of the leg, but a one piece can be used
-- any bottom weight fabric that you like -- I recommend corduroy, denim, or twill, but I have also had great results making them out of french terry and hemp fleece (I loved the hemp fleece pair I sold so much that I have another cut out for my little guy)
-- another fabric to use for the pockets, if you like, though you can also use the same fabric for all pieces
-- elastic for the waist, somewhere between 15 and 20 inches, probably -- I like to use 1 1/2 inches, especially if the fabric is heavy, but I think most people use a 1 inch elastic for kid pants, either is fine
-- thread for construction and topstitching
-- sewing machine and, if you've got one, a serger, but they can be put together on a regular sewing machine
First, we need to alter your pants pattern a bit. You should start with a tracing of your pattern with whatever seam allowance you normally use (I like 1/4"). Lay the pieces on your cutting table and use your rotary cutter to cut one inch off the outside edge of each piece, front and back. If you're using a one piece pattern you'll have to cut it to make it into a two piece pattern by estimating where that outside seam should be and then cut an inch off of each piece. I wouldn't worry too much about seam allowance here. If you'd like them very wide-legged, trim off only 3/4 inch from each piece. And if you don't have a rottary cutter and mat, just use a straight edge to mark off the edge and cut with scissors. If the outside edge of your pants pattern isn't straight, make it straight with 90 degree angles at both ankle and waist. Your original pattern should look something like this and then you will be cutting your inch off each piece like so:

You also need to alter the length, to account for the cuff and the width of your elastic. The finished cuff will add 1" to the length. So, if your pattern is already the right length for your little one, you will have to cut off 1 inch plus the length of the hem (which is usually about one inch). But if your elastic is thicker than that what the original pattern calls for you will have to add in the difference. If you've measured your little one, you will want the outside edge to be the length you want the pants plus the width of your elatic minus one inch.
Once your pattern is all set, it's time to cut your fabric. These are the pieces you'll need:
-- two fronts (mirror image of each other unless your fabric is the same on both sides)
-- two backs (ditto mirror image)
-- two rectangles that are six inches wide and the same length as your pattern pieces plus about an inch (I like to make them longer than necessary and then trim the excess off after sewing the side seams)
-- two pockets, which are six inches wide and the length of your pattern pieces minus six inches
-- two rectangles for lip of the pockets, which are six inches wide and two inches tall (I like to make mine a little more than six inches wide though so I can trim after sewing)
-- two rectangles for the cuffs which will be three inches tall, the length of these should be equal to the circumference of the ankle of your pants plus a little (for trimming after you sew them), you can cut them before you sew up the legs and just overestimate a bit so they don't end up too short, or you can wait till your legs are all sewn up and measure the length of the ankle.
If you're using corduroy, I like to cut the pocket lip and the cuffs so they cord is running in the opposite direction of the main body pieces. I think it looks alot neater than cord that doesn't quite line up, which is especially obvious if you're using wide wale. Plus, it looks cool to have it running horizontally.
So, for each leg you should have these pieces cut before you start sewing:

Before I start sewing I always set up both of my legs like in the above pic and make sure that they will be mirror images of each other after being sewn.
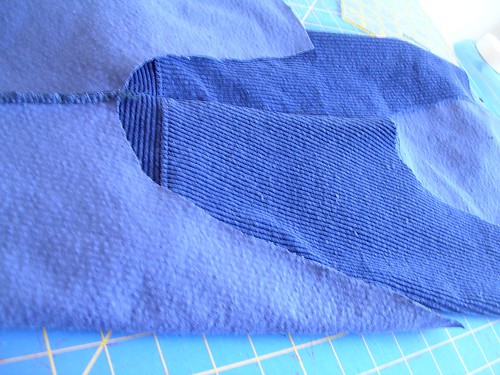
Start by sewing the pocket lip to the pocket. Fold the lip piece in half length-wise and sew it to the right side of the top of your pocket piece. Then topstitch along that seam. I always topstitch so as to have the least thick seam, which in this case means the topstitching will be on the body of the pocket like this:

If you cut your lip longer than the top of your pocket, you can trim it now, or if you're serging, you can just serge it off as you go.
To construct, stack your long rectangle with the pocket on top both facing up and then stack your front piece on top with it's right side facing the right side of your pocket. Make sure all the bottom edges are even with each other. Then, starting at the ankle end, serge the long straight edge so all three layers are serged together. Then topstitch along that long edge so that your stitching is on the front or back piece rather than the pocket. After you topstitch that seam (I like to do the topstitching before the next step bc it makes the pocket lie flatter) stack the back piece on top of the pocket in the same manner with rightsides facing and bottom edges all lined up. Serge that edge and then topstitch the seam away from the pocket.
Now, you need to attach your cuff by folding it in half length-wise and sewing it to the bottom of the pants-half. Then topstitch so that the topstitching runs along the body of the pants rather than on the cuff.
Your pants-half should look like this:

Once you have assembled both pants-halves, you can just put them together like any old pants. Because they have cuffs, though, I like to start with the inseam so I can make sure that the cuffs line up exactly. So with the pants-half folded so that the cuffs are lined up right sides together, I start at the cuff and serge the ineam. Then I have one leg turned inside out and put the other leg, which is right side out, inside it, like so. I line them up making sure that the inseams will meet exactly and I serge the butt curve (is there a more technical term for this?) seam from back waist to front waist and topstitch it toward either side.
To put the waistband in, cut the elastic an inch or two shorter than the child's waist measurement and sew the ends together using a zig-zag stitch, overlapping about 1/2 inch or a little less. I mark the elastic quarters with a sharpie so I can line the marks up with the pants at the front and back seams and mid-pocket on the sides. I put the back seam and elastic under my serger foot with the seam and mark lined up, like this, and then pull the elatic as I serge it on so that the elastic marks line up to the front, back, and sides. And finally, turn your waistband under and stitch the edge down so that the fabric a snug against the elastic but it can still lie flat. You can use either a straight stitch or zig-zag to topstitch your waistband down, but a zz will be less likely to pop.
Your finished product might look something like this, or totally different:


